

Masala Nimki Recipe: Crispy, Crunchy Tea-Time Snack
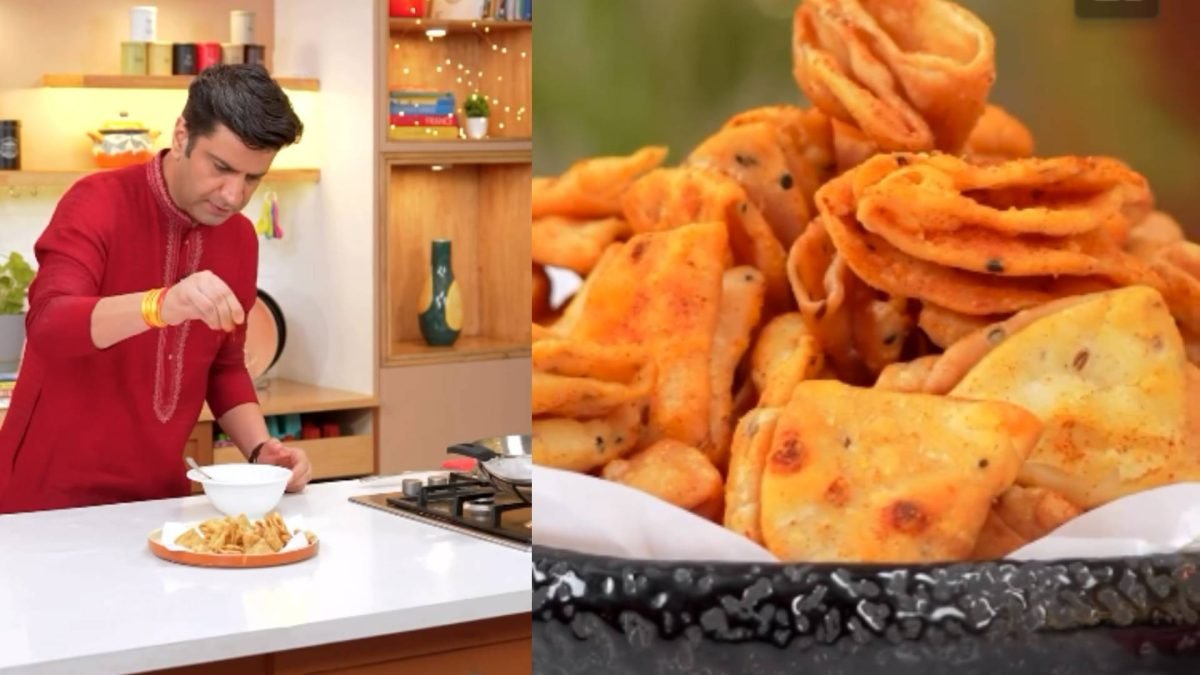
Masala Nimki Recipe: A Crispy Snack for Tea Time
Masala Nimki Recipe is a delicious Indian snack that brings together a flaky, crunchy texture and a flavourful blend of spices. Perfect alongside a hot cup of chai, homemade nimki can be prepared with simple pantry ingredients such as all-purpose flour, ghee, cumin, ajwain, kalonji and black pepper.
Chef Kunal Kapur recently shared a masala nimki recipe featuring a crisp outer layer and a spicy masala coating. The dough is rolled thin, shaped into small triangular pieces and deep-fried over medium-low heat to achieve a crunchy texture.
If you're looking for a homemade snack for your next evening tea, this Masala Nimki Recipe is an easy option to try.
Why You’ll Love This Masala Nimki Recipe
This homemade nimki has several qualities that make it a great tea-time snack:
- Crispy and flaky: Ghee worked into the flour helps create a crisp texture.
- Full of flavour: Cumin, ajwain, kalonji and black pepper add a savoury taste.
- Spicy masala coating: Amchur, Kashmiri chilli and black pepper give the finished nimki a tangy, mildly spicy flavour.
- Tea-time friendly: Serve it with hot chai, coffee or your favourite dip.
- Easy to store: Once completely cooled, the nimki can be kept in an airtight container.
Ingredients for Masala Nimki
For the Dough
- 2 cups all-purpose flour (maida)
- 3–4 tablespoons ghee or oil
- 1 teaspoon cumin seeds
- ½ teaspoon carom seeds (ajwain)
- 1 teaspoon crushed black pepper
- 1 teaspoon kalonji seeds
- Salt to taste, approximately 1 teaspoon
- About ½ cup cold water, or as required
For the Masala Mix
- ½ teaspoon black salt
- ½ tablespoon regular salt
- 2 tablespoons dry mango powder (amchur)
- ¾ tablespoon black pepper powder
- 1¼ tablespoons Kashmiri chilli powder
For Layering and Frying
- 2 tablespoons ghee
- 2 tablespoons all-purpose flour
- Oil or ghee for deep frying
How to Make Masala Nimki
Step 1: Prepare the Dough
Start by taking the all-purpose flour in a large mixing bowl. Add salt, cumin seeds, crushed black pepper, kalonji and ajwain.
Crush the ajwain lightly between your palms before adding it. This helps release its aroma and flavour.
Next, add 3–4 tablespoons of ghee. Rub the ghee thoroughly into the flour with your fingertips until the mixture resembles coarse breadcrumbs. This step is important for achieving a flaky and crispy texture.
Gradually add cold water and knead everything into a firm, stiff dough. Avoid making the dough too soft. Cover it and let it rest for around 10–15 minutes.
Step 2: Make the Ghee-Flour Paste
In a small bowl, combine 2 tablespoons of ghee with 2 tablespoons of all-purpose flour.
Mix well until you get a smooth paste. Keep this mixture aside because it will be used while rolling and shaping the nimki.
Step 3: Roll and Layer the Dough
Take the rested dough and spread it out evenly. Using a rolling pin, roll it as thinly and evenly as possible.
Spread a very thin layer of the prepared ghee-flour mixture over the rolled dough.
Now carefully roll the dough from one end into a long cylindrical shape.
Cut this cylinder into small pieces, approximately 1 cm thick.
Step 4: Shape the Nimki
Take one piece and gently press it down.
Roll it out again as thinly as possible. Keeping the pieces thin helps them cook properly from the inside while frying.
Fold each rolled piece into a triangle. Apply a tiny amount of water to seal the edges and gently press the centre.
Repeat the process with the remaining dough pieces.
Step 5: Fry Until Golden and Crispy
Heat oil in a deep kadai over medium-low heat.
The temperature is important when making Masala Nimki Recipe. Frying over low to medium-low heat allows the nimki to cook properly and develop a crunchy texture.
Add the shaped nimki in batches without overcrowding the kadai. Fry until they become golden brown and crisp.
Once cooked, remove them carefully and place them on paper towels to drain excess oil.
Step 6: Add the Masala
For the final masala coating, combine black salt, regular salt, amchur powder, black pepper powder and Kashmiri chilli powder in a bowl.
While the fried nimki is still slightly warm, sprinkle the spice mixture over it.
Toss gently so that the masala coats the pieces evenly.
Allow the nimki to cool completely before serving or storing.
Tips for Crispy Masala Nimki
Keep the Dough Stiff
A firm dough gives the nimki a better texture. Avoid adding too much water while kneading.
Roll the Dough Thinly
Thinner pieces cook more evenly and help create the characteristic crunch of nimki.
Fry on Medium-Low Heat
Avoid frying the nimki on high heat. The outside can brown quickly while the inside may not become properly crisp.
Don't Overcrowd the Kadai
Fry the pieces in small batches so they have enough space to cook evenly.
Cool Before Storing
Always let the nimki cool completely before transferring it to an airtight container. Storing it while warm can affect its crunchiness.
How to Serve Masala Nimki
Serve this crispy snack with a freshly brewed cup of chai for a classic evening combination. It can also be enjoyed with green chutney, tamarind chutney or your favourite homemade dip.
The spicy masala coating makes these nimki especially enjoyable when you're craving something savoury and crunchy.
How to Store Masala Nimki
Once completely cooled, place the nimki in a clean, dry airtight container. Keep the container closed between servings to help maintain its crisp texture.
Making a larger batch can also make it easier to have a homemade tea-time snack ready whenever you need one.
Final Thoughts
This Masala Nimki Recipe combines a crisp, flaky texture with aromatic spices and a tangy masala coating. From kneading the dough and creating the layers to shaping and slow-frying the nimki, each step contributes to the final crunch.
For a homemade snack that pairs beautifully with evening chai, this masala nimki is a simple recipe worth adding to your snack collection.
Related News
 OCT 13, 2026
Avneet Kaur Steals the Spotlight With Her Radiant Beauty, Chic Style, and Effortless Charm
Avneet Kaur is once again capturing attention with her stunning appearance, infectious smile, and effortlessly fashionable style
 OCT 13, 2026
Jacqueline Fernandez Turns Heads With Golden Glamour, Radiant Beauty, and Effortless Elegance
Jacqueline Fernandez continues to embody the captivating blend of glamour, confidence, and sophistication that makes her one of Bollywood’s most recognizable style personalities.
 OCT 12, 2026
9 Must-Visit Devi Temples in India for Every Devotee
From the sacred cave of Mata Vaishno Devi to the magnificent Meenakshi Amman Temple, discover nine revered Devi temples in India that showcase the country's spiritual heritage, ancient traditions and diverse forms of Goddess worship.
 OCT 12, 2026
Sabudana Dosa Recipe: Make Crispy Vrat-Friendly Dosa at Home
Try this easy sabudana dosa recipe for a crispy and delicious vrat-friendly meal that offers a tasty break from the usual puri and potato dishes.